
The first year BTEC group that I get to teach this year appear to be very nice - all impressively hard working and producing the goods left right and centre! They are in the middle of a project that I wrote, which is based on creating a whole range of images based on a single hand tool - anything from a wrench to an egg whisk! As a demo I chose a pair of scissors - well I would wouldn't I?! I am so used to teaching the older students that I forget that when a student has no previous experience of a certain technique it can be like I am talking martian (some would say that is just normal for me, which is quite rude, but also quite true!), so it is easier to do what you are hoping they might do yourself first - I know that I have confused the hell out of them about PhotoShop, but hopefully our version of relief printing (gold card printing) has sunk in.....
Firstly a simple collage which has been drawn upon and then manipulated through PhotoShop with a) the curve tool, and then the gradient map tool (both found in image adjustment).


Now for the gold card printing - you will need, some gold card (ours is the unethically sourced remnant's from a well know cigarette brand), tracing paper, pencil and some tape to keep things in place - oh yes, and your object - the one you are going to draw....

Draw your image onto tracing paper and then transfer it down onto your gold card...
 Using a scalpel start to etch in your image - when you score/damage the top layer of the card the shiny part can be removed, leaving a rough layer - this is what will absorb the ink and allow you to create an image - you'll see.... I have taken both large sections of the card away and used the tip of the scalpel to scratch in finer areas to create the illustration of shading.
 Next, using the thick black printing ink that you would use for monoprinting (looks like tar), squish this into the exposed areas of your plate (the gold card) with some scrim mesh. Where the white shows the ink will permanently sit, where the gold card is still intact the ink will slide around and may then be removed in order to develop a nice crisp print, although it is worth considering the fact that this excess ink can be used to create some shadow around your image.
 A clean piece of scrim is used to remove the excess ink and then a piece of tracing paper can be used to really define areas of reflection/shine etc.
Cleaned up plate ready to print...

So you will need to locate a piece of paper to print it on! This needs to be damp so that it is super receptive to the ink - we have (a rather grubby) paint tray filled with water for this job - just dunk your paper in and then give it a quick blot between some newspaper to take the excess moisture away.

 The press - ta daaa! Mark's pride and joy, hence the padlock - actually there is a serious reason for this - the actual plate if it fell out due to a bit of carelessness, could chop your foot off during its decent to earth, so we will always be supervising you!
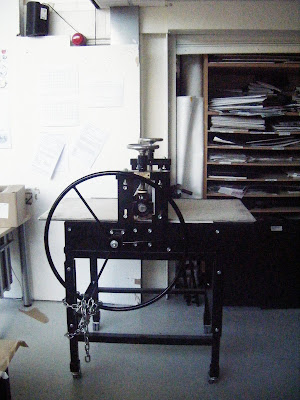
face up - put your damp paper down on top and place the top layer of blanket and paper back down on top of the plate is a pile of blanket and paper - find the middle and pop your print plate down .


Turn the wheel so as to travel the base plate back and forth - the rollers top and bottom are what apply the pressure and transfer the ink from your plate to your paper, and then hopefully......
 You will have a beautiful print! Peel the paper off the blanket as it often gets stuck and away you go to show off your wonderful piece of work!
No comments:
Post a Comment